installation
there are four supported ways to install or update the owlette agent on a Windows machine.
- Interactive packaged installer for a single machine
- Silent packaged installer with
/ADD=for bulk enrollment - Remote deployment to machines that already run the agent
- Manual packaged repair or source-development setup
method 1: interactive packaged install
Download the packaged installer, run it as Administrator, and authorize the machine with the device-code pairing flow.
steps
- Log into the owlette dashboard.
- Click the download button in the header bar.
- Save
Owlette-Installer-v<version>.exeto the target machine. - Right-click the installer and select Run as administrator.
- Follow the installer wizard.
- When the console appears, the agent prints the pairing phrase and authorization URL, then immediately begins waiting for authorization.
- Press Enter only if you want to open the pairing page in the local browser, or authorize from another device by visiting the displayed URL and entering the phrase. The agent is already polling, so pairing completes within seconds of approval.
- The agent stores credentials and installs the Windows service.
Pairing phrases expire after 10 minutes. Credentials are stored encrypted at C:\ProgramData\Owlette\.tokens.enc.
Kiosks, signage, media servers, and headless or RDP machines: leave the prompt unanswered, or set
OWLETTE_NO_BROWSER=1before launching the installer to hide the local-browser prompt entirely. The agent still starts polling immediately, and you authorize from your phone or another computer. When re-pairing manually, pass--no-browsertoconfigure_site.pyfor the same effect.
method 2: silent install with /ADD=
Use this path for bulk deployment when an admin has already generated and authorized a pairing phrase.
steps
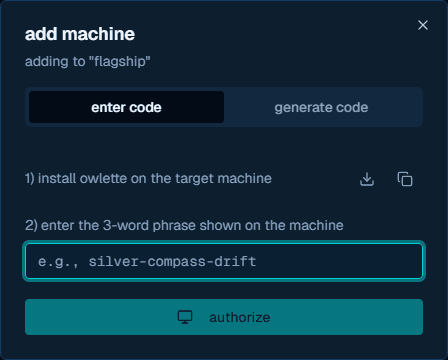
- In the dashboard, click the
+button next to the view toggle. - Open Generate Code.
- Copy the pairing phrase, for example
silver-compass-drift. - Run the installer on each target machine:
Owlette-Installer-v<version>.exe /ADD=silver-compass-drift /SILENTFor a fully quiet install:
Owlette-Installer-v<version>.exe /ADD=silver-compass-drift /VERYSILENT /SUPPRESSMSGBOXES /NORESTARTThe installer passes /ADD= to configure_site.py --add. The agent polls /api/agent/auth/device-code/poll with the phrase and completes as soon as the server returns tokens.
installer flags
| flag | description |
|---|---|
/ADD=phrase | Preauthorized pairing phrase for silent enrollment |
/SERVER=prod | Use https://owlette.app/api; this is the default |
/SERVER=dev | Use https://dev.owlette.app/api |
/OPENBROWSER=1 | Open the pairing page immediately instead of waiting for Enter |
/SILENT | Minimal UI with progress only |
/VERYSILENT | No installer UI |
/SUPPRESSMSGBOXES | Suppress message boxes |
/DIR="C:\path" | Custom install directory |
/NORESTART | Do not restart after installation |
/LOG="C:\path\setup.log" | Write an Inno Setup log to the chosen path |
Example for the dev environment:
Owlette-Installer-v<version>.exe /SERVER=dev /ADD=silver-compass-drift /VERYSILENT /SUPPRESSMSGBOXES /NORESTARTmethod 3: remote deployment or upgrade
Remote deployment requires a target machine that already has a running owlette agent. The agent receives an install_software command, downloads the installer, verifies its SHA-256 checksum, and then executes it with the provided silent flags.
Required fields for an owlette agent upgrade:
| field | required | notes |
|---|---|---|
installer_url | yes | Direct URL to the installer .exe |
installer_name | no | Defaults to installer.exe when omitted |
silent_flags | no | Use installer flags such as /VERYSILENT /SUPPRESSMSGBOXES /NORESTART |
sha256_checksum | yes | 64-character SHA-256 of the installer; the agent refuses remote installs without it |
verify_path | no | Optional path checked after installation |
timeout_seconds | no | Defaults to 2400 seconds |
Example command payload:
{
  "installer_url": "https://downloads.example.com/Owlette-Installer-v<version>.exe",
  "installer_name": "Owlette-Installer-v<version>.exe",
  "silent_flags": "/VERYSILENT /SUPPRESSMSGBOXES /NORESTART /SERVER=prod",
  "sha256_checksum": "<64-character sha256>",
  "verify_path": "C:\\ProgramData\\Owlette\\agent\\src\\owlette_service.py",
  "timeout_seconds": 2400
}
In the dashboard deployment flow, provide the installer URL, silent flags, optional verify path from a preset/template when available, and target machines. For remote installs, ensure the command includes sha256_checksum; the current deployment dialog does not collect it directly.
method 4: manual packaged repair or source development
There are two distinct manual flows.
packaged installer layout
Use this only on a machine that already has the packaged layout under C:\ProgramData\Owlette. The service installer script expects embedded Python, NSSM, scripts, and agent source in that layout:
C:\ProgramData\Owlette\python\python.exeC:\ProgramData\Owlette\tools\nssm.exeC:\ProgramData\Owlette\scripts\install.batC:\ProgramData\Owlette\agent\src\owlette_runner.py
To re-run pairing:
cd /d C:\ProgramData\Owlette
python\python.exe agent\src\configure_site.py
To repair the Windows service registration:
cd /d C:\ProgramData\Owlette
scripts\install.bat
source clone for development
A raw source clone does not include the packaged python\, tools\, or installed service layout. Use it for development, testing, or building a new installer package:
git clone https://github.com/theexperiential/owlette.git
cd owlette\agent
python -m pip install -r requirements.txt
Do not run agent\scripts\install.bat directly from a raw clone unless you have first built or staged the same packaged layout that the installer creates.
how pairing works
The installer runs configure_site.py after copying files and before installing the service, unless an existing valid site configuration is already present.
Authorization options:
| method | when to use |
|---|---|
| Local browser | Single-machine install when the target machine has a usable browser - press Enter to open the pairing page |
Another device (--no-browser) | Headless/RDP machines, or kiosks showing live content - set OWLETTE_NO_BROWSER=1 (or pass --no-browser) and authorize from your phone or another computer |
/ADD= | Bulk install with a preauthorized phrase |
post-installation verification
After installation, verify the agent is running.
check windows services
- Open Services (
Win + R, thenservices.msc). - Find
OwletteService. - Confirm the status is Running.
check logs
C:\ProgramData\Owlette\logs\service.log
C:\ProgramData\Owlette\logs\service_stdout.log
C:\ProgramData\Owlette\logs\service_stderr.log
C:\ProgramData\Owlette\logs\pairing_debug.log
Useful startup lines include:
OWLETTE AGENT STARTING - v<version>
STARTUP COMPLETE
Firebase client initialized for site: <site_id>
Firebase client started successfully
owlette initialized
check dashboard
The machine should appear in the selected site with:
- Online status
- CPU, memory, and disk metrics
- Agent version
check system tray
The owlette tray icon starts through the user's Startup folder. If it is not visible, check the hidden-icons overflow menu or launch Owlette from the Start menu.
uninstallation
Use Windows Settings > Apps > owlette > Uninstall.
The uninstaller:
- Stops
OwletteService. - Removes the NSSM service wrapper.
- Removes the Windows Defender exclusions added by the installer.
- Removes installed component directories:
python\,agent\,tools\, andscripts\. - Removes installed top-level files such as
README.mdandLICENSE.
By default, it preserves user data under C:\ProgramData\Owlette, including:
config\logs\cache\tmp\.tokens.enc
In non-silent uninstall mode, the uninstaller asks whether to remove all owlette configuration and data files. Accept that prompt only when you want a full cleanup. Silent uninstalls preserve data for upgrade and repair flows.
installer details
The owlette installer is built with Inno Setup and bundles:
| component | purpose |
|---|---|
| Embedded Python | Python runtime; no system Python is needed for packaged installs |
| NSSM | Windows service wrapper at C:\ProgramData\Owlette\tools\nssm.exe |
| Agent source | Python modules under C:\ProgramData\Owlette\agent\src\ |
| Configuration GUI | Local configuration tool |
| System tray | Background tray icon for status monitoring |
system requirements
| requirement | minimum |
|---|---|
| OS | Windows 10 or later, 64-bit |
| RAM | 50 MB agent overhead |
| Disk | About 200 MB including embedded Python |
| Network | Access to the configured owlette API and Firebase services |
| Permissions | Administrator privileges for service installation |
agent
The owlette agent is a Python Windows service that runs in the background, monitoring your processes, collecting system metrics, and syncing everything to the cloud. It's the core of the owlette system — every machine you want to manage needs an agent installed.
configuration
The agent can be configured locally via the GUI, remotely from the web dashboard, or by editing config.json directly. The local source file is C:\ProgramData\Owlette\config\config.json.